댓글 쓰기 권한이 없습니다. 로그인 하시겠습니까?
|
Pi
2017.10.17 17:11
라즈베리파이를 크롬캐스트 처럼 사용하는 방법 - RaspiCast
조회 수 9071 댓글 0
출처 : https://thepi.io/how-to-use-your-raspberry-pi-as-a-chromecast-alternative/ How to use your Raspberry Pi as a Chromecast alternativeGoogle’s Chromecast is one of the most popular audio and video streaming devices out there. The small device plugs into an HDMI port and is controlled by a computer or mobile device. Casting is as simple as tapping a button in supported apps. But Chromecast isn’t your only option for this sort of functionality – you can do something similar with the Raspberry Pi. In this tutorial, I’m going to show you how you can use your Raspberry Pi as a Chromecast alternative. It’s worth a mention that this will make your Raspberry Pi be exactly that: an alternative to, not a carbon copy of, Google’s device. This alternative doesn’t support Google’s Cast button, but it does support streaming YouTube videos as well as local audio, images, and videos from your smart device to your TV. Here’s how to use your Raspberry Pi as a Chromecast alternative.
How to use your Raspberry Pi as a Chromecast alternativeFor this project, we’ll need to have a couple of programs installed on the Raspberry Pi (OMXPlayer and OpenMax image viewer for the Raspberry Pi) and one installed on the device you want to cast from (Raspicast). The audio and video content that you stream from your smart device to your Raspberry Pi and your TV will be played using OMXPlayer, and the image content will be displayed using OpenMax image viewer for the Raspberry Pi. Raspbian comes with OMXPlayer already installed, so that’s the operating system we’ll use in this tutorial (if you don’t yet have Raspbian installed, The Pi can help). We will have to install a couple of libraries and a program called OpenMax image viewer for the Raspberry Pi.
Step 1: Check for updatesIt’s always wise to start with checking for the latest Raspbian updates by running these commands in Terminal: sudo apt-get update sudo apt-get upgrade
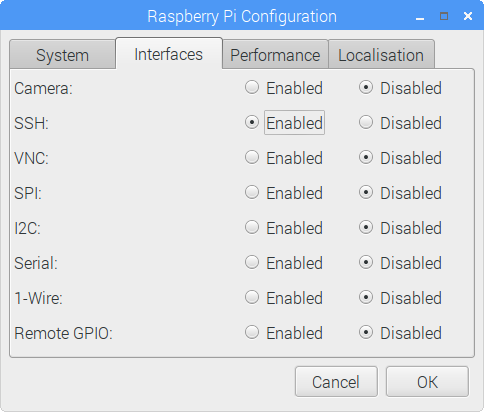
Step 2: Enable SSHIn order for this project to work, we have to have SSH enabled on the Raspberry Pi. There are a couple of ways to enable SSH: using the GUI or Terminal. We’ll cover both below. Using the GUINavigate to Preferences > Raspberry Pi Configuration and click Interfaces. While there, select SSH: Enabled.
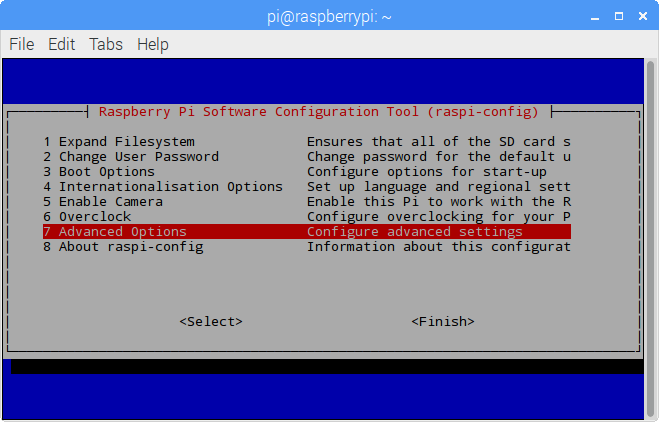
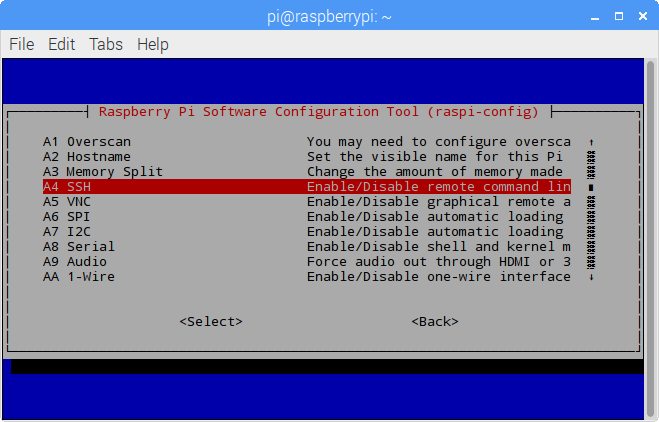
Using TerminalRun the following command in Terminal: sudo raspi-config Then navigate to Advanced Options and select SSH. You’re asked whether you’d like the SSH server to be enabled. Select Yes. After that, you can exit the config.
Step 3: Clone the OpenMax image viewer for the Raspberry Pi repositoryWe want to use our Chromecast alternative to cast images, so we’ll need to have OpenMax image viewer for the Raspberry Pi installed. The program’s repository resides on GitHub. Let’s clone the repository to our Raspberry Pi. Open Terminal and run the following command: git clone https://github.com/HaarigerHarald/omxiv Alright, let’s move on.
Step 4: Install the necessary packagesCloning the image viewer’s repository isn’t enough: we still have to build and install the program. In order to build the image viewer, we’ll need to have some additional packages installed. Here is the command that we have to run next: sudo apt-get install libjpeg8-dev libpng12-dev These packages (libjpeg8-dev and libpng-12-dev) contain the development headers needed to build programs that use the libjpeg and libpng libraries. Libjpeg and libpng are C libraries for handling JPEG and PNG images, respectively.
Step 5: Build and installWe’re now ready for building and installing the OpenMax image viewer. These short commands are all we need: cd omxiv make ilclient make sudo make install Now that we the image viewer installed, we won’t be needing the Pi for a short while.
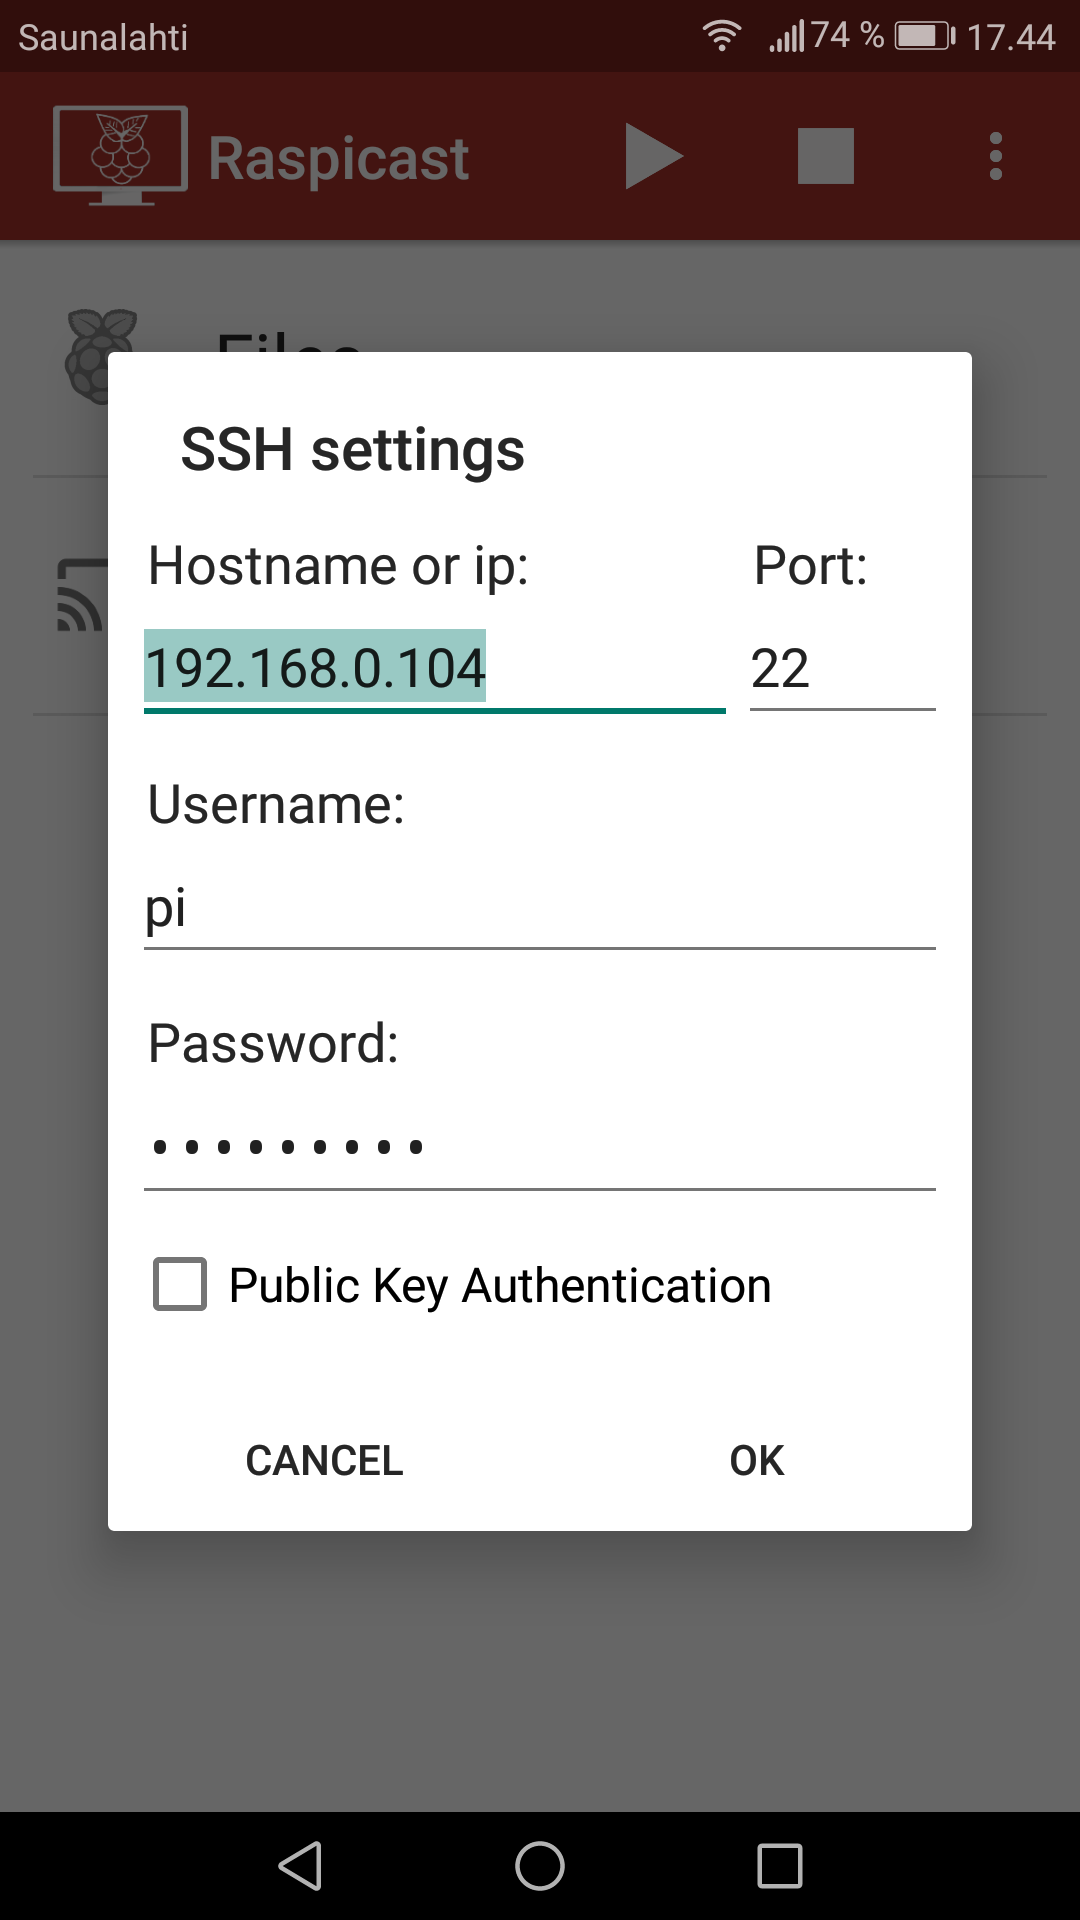
Step 6: Download and install RaspicastOn your Android device, launch the Google Play Store and search for Raspicast. Raspicast is the app that lets us stream content from our smart devices to our Raspberry Pis and our TVs. After you’ve installed Raspicast, you’ll need to modify some settings. Raspicast needs to know your Raspberry Pi’s IP address and credentials in order to work properly. Hop back onto your Pi and run this command in Terminal: hostname -I The command will return your Raspberry Pi’s private IP address. Write that down and continue with Raspicast’s settings dialog. If you haven’t changed your credentials, your username is pi and your password is raspberry.
Once you’re ready with the settings, Raspicast should be able to connect to your Pi, and you should be able to stream content from your mobile device to the big screen. Just tap Cast on Raspicast’s home screen and choose the content that you want to be casted. If you want to cast YouTube videos, you can do so within the YouTube app: choose a video, tap the share button, and select Raspicast from the list of choices. Dreamy의 코드 스크랩내가 모으고 내가 보는
| ||||||||||||||||||||||||||||||||||||||||||||||||||||||||||||||||||||||||||||||||||||||||||||||||